React를 사용하면서 컴포넌트에 CSS를 적용하는 방법에 대해 단계별로 알아봅시다.
✅ 전역으로 CSS 설정
/* styles.css */

button {
  color: white;
  background-color: tomato;
}
src 폴더 안에 styles.css라는 파일을 생성한 뒤 button 태그의 스타일을 지정해줍시다.
// index.js

import React from "react";
import ReactDOM from "react-dom/client";
import App from "./App";
import "./styles.css";

const root = ReactDOM.createRoot(document.getElementById("root"));
root.render(
  <React.StrictMode>
    <App />
  </React.StrictMode>
);
그 후 index.js에서 styles.css를 import하면
모든 컴포넌트에 존재하는 button에 대해 CSS 스타일이 적용됩니다.
하지만 우리는 모든 버튼에 적용되는 것을 원하지 않습니다.
✅ style prop 설정
import PropTypes from "prop-types";

function Button({ text }) {
  return (
    <button
      style={{
        backgroundColor: "tomato",
        color: "white",
      }}
    >
      {text}
    </button>
  );
}

Button.propTypes = {
  text: PropTypes.string.isRequired,
};

export default Button;
Button 컴포넌트에 직접 style 속성을 적용하여 전역으로 사용되는 것을 막을 수 있습니다.
하지만 이 방법도 style을 직접 넣어야 하고 코드가 엄청나게 길어지며 한 파일 안에 모든 CSS 코드가 존재하게 됩니다.
또 CSS의 힘을 잃기 때문에 불편함이 있습니다.
✅ CSS modules
/* Button.module.css */

.btn {
  color: white;
  background-color: tomato;
}styles.css를 Button.module.css로 이름을 변경하고 button을 .btn 클래스 선택자로 바꿔줍니다.
// Button.js

import PropTypes from "prop-types";
import styles from "./Button.module.css";

function Button({ text }) {
  return <button className={styles.btn}>{text}</button>;
}

Button.propTypes = {
  text: PropTypes.string.isRequired,
};

export default Button;
우리는 CSS 코드를 작성하지만 create-react-app은 CSS 코드를 javascript 오브젝트로 변환해줍니다.
이 javascript 오브젝트는 안에 btn을 가지고 있습니다.
따라서 button에 className으로 styles.btn을 사용하여 CSS 코드를 넣어줄 수 있습니다.
브라우저에서 적용된 것을 확인해보면 무작위로 랜덤 class를 적용시켜줍니다.
랜덤으로 적용해주기 때문에 다른 클래스 이름들을 기억할 필요가 없어집니다.
✏️ 같은 이름의 클래스 명
만약 App.module.css와 Button.module.css에 같은 클래스 이름이 있고
이름은 같지만 다른 스타일을 적용하고 싶다면 클래스 명이 중복되어 문제가 생기지 않을까 하는 의문이 듭니다.
// App.js

import Button from "./Button";
import styles from "./App.module.css";

function App() {
  return (
    <div>
      <h1 className={styles.title}>Welcome back!</h1>
      <Button text={"Continue"} />
    </div>
  );
}

export default App;
/* App.module.css */
.title {
font-size: 18px;
}
// Button.js

import PropTypes from "prop-types";
import styles from "./Button.module.css";

function Button({ text }) {
  return <button className={styles.title}>{text}</button>;
}

Button.propTypes = {
  text: PropTypes.string.isRequired,
};

export default Button;
/* Button.module.css */
.title {
color: white;
background-color: tomato;
}
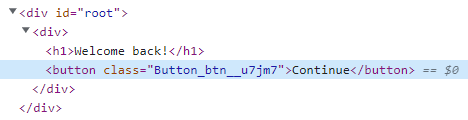
위의 코드처럼 App.module.css와 Button.module.css에서 title이라는 같은 클래스 이름을 사용해도
각각의 랜덤한 클래스 이름이 적용되기 때문에 전혀 문제가 없습니다.
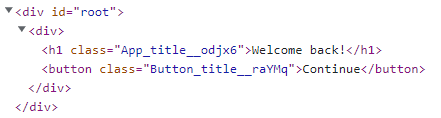
결과를 보면 App.js에서는 App_title__odjx6이라는 클래스 이름으로 변환되었고
Button.js에서는 Button_title__raYMq라는 클래스 이름으로 변환되었습니다.
전혀 다른 값이기 때문에 클래스 명이 중복되어도 문제가 없어지며 이것이 CSS modules의 장점입니다.
'이론 (Front-end) > React' 카테고리의 다른 글
| [React] useEffect (1) | 2023.07.16 |
|---|---|
| [React] create-react-app로 프로젝트 생성하기 (0) | 2023.07.14 |
| [React] Props, Memo, Prop Types (0) | 2023.07.13 |
| [React] select 태그를 통한 컴포넌트 제어 (0) | 2023.07.12 |
| [React] input 값 사용하기 (0) | 2023.06.14 |